简介

Apache Ranger为Hadoop体系提供了同意的安全体系,包括访问权限控制和统一的审计(记录谁访问Ranger进行权限设置或者校验等操作)。如果想要开发一个Ranger的插件主要三个部分:

Ranger服务端:需要定义一个服务类型JSON文件上传给Ranger Service,以及实现一个RangerBaseService类作为Ranger服务的资源查找,或者配置检验的jar包放到Ranger服务的range-plugins/目录。

Ranger鉴权的插件:根据Ranger提供的接口实现一个鉴权的插件,这个插件会定时从Ranger-Service端将权限同步到本地,需要鉴权的服务可以用对应的接口来进行权限校验。很多服务例如doris,hive是将这个插件集成到了他们的服务中,当然也可以拿出来单独使用,例如自己解析Sql语句拿到用户以及对应表时在调用插件接口进行鉴权。

Ranger授权api:这一部分可以通过Ranger提供的UI手动进行添加,ranger也提供了api,用户可以通过api进行新增权限,或者删除更改权限等。权限这块Ranger内称之为RangerPolicy策略。
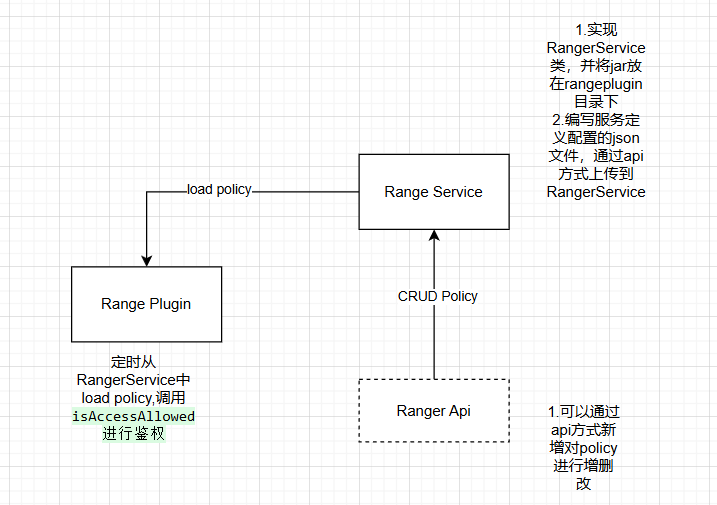
image-20241231173211402.png

Ranger服务端

实现RangerBaseService类

public class RangerServicePaimon extends RangerBaseService {
    @Override
    public Map<String, Object> validateConfig() {

        return new HashMap<>();
    }
    @Override
    public List<String> lookupResource(ResourceLookupContext resourceLookupContext) throws Exception {

        return new ArrayList<>();
    }
}

此类有两个方法,都是用于在Ranger Service UI上做资源查询,或者配置检验时用的,可以不做实现,直接返回空也没问题。之后需要将实现的jar包放入range-plugins/目录下之后重启Ranger服务。

服务定义描述文件

{
  "name": "paimon",
  "displayName": "Paimon",
    //对应jar包的service实现类
  "implClass": "com.jiduauto.ranger.service.paimon.RangerServicePaimon", 
  "label": "Paimon",
  "description": "Paimon",
  //需要进行权限检验的资源
  "resources": [
    {
      "itemId": 1,
      "name": "catalog",
      "type": "string",
      "level": 10,
      "parent": "",
      "mandatory": true,
      "isValidLeaf": true,
      "lookupSupported": true,
      "recursiveSupported": false,
      "excludesSupported": true,
      "matcher": "org.apache.ranger.plugin.resourcematcher.RangerDefaultResourceMatcher",
      "matcherOptions": {
        "wildCard": true,
        "ignoreCase": true
      },
      "validationRegEx": "",
      "validationMessage": "",
      "uiHint": "",
      "accessTypeRestrictions": [
        "create",
        "show",
        "alter",
        "drop"
      ],
      "label": "Paimon Catalog",
      "description": "Paimon Catalog"
    },
    {
      "itemId": 2,
      "name": "database",
      "type": "string",
      "level": 20,
      "parent": "catalog",
      "mandatory": true,
      "isValidLeaf": true,
      "lookupSupported": true,
      "recursiveSupported": false,
      "excludesSupported": true,
      "matcher": "org.apache.ranger.plugin.resourcematcher.RangerDefaultResourceMatcher",
      "matcherOptions": {
        "wildCard": true,
        "ignoreCase": true
      },
      "validationRegEx": "",
      "validationMessage": "",
      "uiHint": "",
      "accessTypeRestrictions": [
        "create",
        "show",
        "alter",
        "drop"
      ],
      "label": "Paimon Database",
      "description": "Paimon Database"
    },
    {
      "itemId": 3,
      "name": "table",
      "type": "string",
      "level": 30,
      "parent": "database",
      "mandatory": true,
      "isValidLeaf": true,
      "lookupSupported": true,
      "recursiveSupported": false,
      "excludesSupported": true,
      "matcher": "org.apache.ranger.plugin.resourcematcher.RangerDefaultResourceMatcher",
      "matcherOptions": {
        "wildCard": true,
        "ignoreCase": true
      },
      "validationRegEx": "",
      "validationMessage": "",
      "uiHint": "",
      "accessTypeRestrictions": [
        "create",
        "show",
        "alter",
        "drop",
        "insert",
        "select"
      ],
      "label": "Paimon Table",
      "description": "Paimon Table"
    },
    {
      "itemId": 4,
      "name": "column",
      "type": "string",
      "level": 40,
      "parent": "table",
      "mandatory": true,
      "lookupSupported": true,
      "recursiveSupported": false,
      "excludesSupported": true,
      "matcher": "org.apache.ranger.plugin.resourcematcher.RangerDefaultResourceMatcher",
      "matcherOptions": {
        "wildCard": true,
        "ignoreCase": true
      },
      "validationRegEx": "",
      "validationMessage": "",
      "uiHint": "",
      "accessTypeRestrictions": [
        "select"
      ],
      "label": "Paimon Column",
      "description": "Paimon Column"
    }
  ],//需要进行校验的访问类型
  "accessTypes": [
    {
      "itemId": 1,
      "name": "show",
      "label": "Show"
    },
    {
      "itemId": 2,
      "name": "insert",
      "label": "Insert"
    },
    {
      "itemId": 3,
      "name": "alter",
      "label": "Alter"
    },
    {
      "itemId": 4,
      "name": "create",
      "label": "Create"
    },
    {
      "itemId": 5,
      "name": "drop",
      "label": "Drop"
    },
    {
      "itemId": 6,
      "name": "select",
      "label": "Select"
    },
    {
      "itemId": 7,
      "name": "all",
      "label": "All",
      "impliedGrants":
      [
        "select",
        "insert",
        "create",
        "drop",
        "alter",
        "show"
      ]
    }
  ],
   // ranger serviceUI上需要填写的配置,RangerBaseService的validateConfig方法就是对这些配置进行校验
  "configs": [
    {
      "itemId": 1,
      "name": "username",
      "type": "string",
      "mandatory": true,
      "validationRegEx": "",
      "validationMessage": "",
      "uiHint": "",
      "label": "Username"
    },
    {
      "itemId": 2,
      "name": "password",
      "type": "password",
      "mandatory": false,
      "validationRegEx": "",
      "validationMessage": "",
      "uiHint": "",
      "label": "Password"
    },
    {
      "itemId": 3,
      "name": "jdbc.driver_class",
      "type": "string",
      "mandatory": true,
      "validationRegEx": "",
      "validationMessage": "",
      "uiHint": "",
      "defaultValue": "com.mysql.cj.jdbc.Driver"
    },
    {
      "itemId": 4,
      "name": "jdbc.url",
      "type": "string",
      "mandatory": true,
      "defaultValue": "",
      "validationRegEx": "",
      "validationMessage": "",
      "uiHint": ""
    }
  ],
  "enums": [
  ],
  "contextEnrichers": [
  ],
  "policyConditions":
  [
  ],//对数据某些字段进行脱敏使用
  "dataMaskDef": {
    "accessTypes": [
      {
        "name": "select"
      }
    ],
    "resources": [
      {
        "name": "catalog",
        "matcherOptions": {
          "wildCard": "true"
        },
        "lookupSupported": true,
        "uiHint":"{ \"singleValue\":true }"
      },
      {
        "name": "database",
        "matcherOptions": {
          "wildCard": "true"
        },
        "lookupSupported": true,
        "uiHint":"{ \"singleValue\":true }"
      },
      {
        "name": "table",
        "matcherOptions": {
          "wildCard": "true"
        },
        "lookupSupported": true,
        "uiHint":"{ \"singleValue\":true }"
      },
      {
        "name": "column",
        "matcherOptions": {
          "wildCard": "true"
        },
        "lookupSupported": true,
        "uiHint":"{ \"singleValue\":true }"
      }
    ],//脱敏的函数
    "maskTypes": [
      {
        "itemId": 1,
        "name": "MASK",
        "label": "Redact",
        "description": "Replace lowercase with 'x', uppercase with 'X', digits with '0'",
        "transformer": "mask({col})",
        "dataMaskOptions": {
        }
      },
      {
        "itemId": 2,
        "name": "MASK_SHOW_LAST_4",
        "label": "Partial mask: show last 4",
        "description": "Show last 4 characters; replace rest with 'x'",
        "transformer": "mask_show_last_n({col}, 4, 'x', 'x', 'x', -1, '1')"
      },
      {
        "itemId": 3,
        "name": "MASK_SHOW_FIRST_4",
        "label": "Partial mask: show first 4",
        "description": "Show first 4 characters; replace rest with 'x'",
        "transformer": "mask_show_first_n({col}, 4, 'x', 'x', 'x', -1, '1')"
      },
      {
        "itemId": 4,
        "name": "MASK_HASH",
        "label": "Hash",
        "description": "Hash the value",
        "transformer": "mask_hash({col})"
      },
      {
        "itemId": 5,
        "name": "MASK_NULL",
        "label": "Nullify",
        "description": "Replace with NULL"
      },
      {
        "itemId": 6,
        "name": "MASK_NONE",
        "label": "Unmasked (retain original value)",
        "description": "No masking"
      },
      {
        "itemId": 12,
        "name": "MASK_DATE_SHOW_YEAR",
        "label": "Date: show only year",
        "description": "Date: show only year",
        "transformer": "mask({col}, 'x', 'x', 'x', -1, '1', 1, 0, -1)"
      },
      {
        "itemId": 13,
        "name": "CUSTOM",
        "label": "Custom",
        "description": "Custom"
      }
    ]
  },//对数据行级过滤
  "rowFilterDef": {
    "accessTypes": [
      {
        "name": "select"
      }
    ],
    "resources": [
      {
        "name": "catalog",
        "matcherOptions": {
          "wildCard": "true"
        },
        "lookupSupported": true,
        "mandatory": true,
        "uiHint": "{ \"singleValue\":true }"
      },
      {
        "name": "database",
        "matcherOptions": {
          "wildCard": "true"
        },
        "lookupSupported": true,
        "mandatory": true,
        "uiHint": "{ \"singleValue\":true }"
      },
      {
        "name": "table",
        "matcherOptions": {
          "wildCard": "true"
        },
        "lookupSupported": true,
        "mandatory": true,
        "uiHint": "{ \"singleValue\":true }"
      }
    ]
  }
}

说白了就是定义一些资源,以及对这些资源进行校验的访问类型。例如table资源支持的访问类型是"create","show", "alter","drop","insert","select"。

这里简单说一下dataMaskDef,例如用户查询时想对某些字段进行脱密,他的查询sql是:SELECT NAME,PHONE FROM USER;对phone字段想做脱敏的话可以将查询修改为:SELECT NAME,CAST(mask(PHONE) AS STRING) FROM USER。实现这个功能就需要平台侧拿到sql之后对sql进行解析得到表的字段,之后访问Ranger判断这个字段需不需要进行datamask,需要的或就将其转换成对应的函数。

https://juejin.cn/post/7231858374827933753这篇文章讲的更细致一些,可以参考。

注意:range只是用做记录哪些表的字段需要做datamask,具体解析sql之类的需要平台自己去做,可以将Ranger当做一个记录了权限相关信息的数据库来看。

Ranger Plugin

rangerPlugin会定时从service load相关policy到本地做鉴权。需要定义三个xml文件。需要将以下三个文件放在resources文件下,或者放在java启动时classpath下:

ranger-paimon-dev-audit.xml

<?xml version="1.0" encoding="UTF-8"?>
<?xml-stylesheet type="text/xsl" href="configuration.xsl"?>
<configuration>
</configuration>

ranger-paimon-dev-policymgr-ssl.xml

<?xml version="1.0"?>
<?xml-stylesheet type="text/xsl" href="configuration.xsl"?>
<configuration xmlns:xi="http://www.w3.org/2001/XInclude">
    <!--  The following properties are used for 2-way SSL client server validation -->
    <property>
        <name>xasecure.policymgr.clientssl.keystore</name>
        <value>hadoopdev-clientcert.jks</value>
        <description>
            Java Keystore files
        </description>
    </property>
    <property>
        <name>xasecure.policymgr.clientssl.truststore</name>
        <value>cacerts-xasecure.jks</value>
        <description>
            java truststore file
        </description>
    </property>
    <!--路径自己指定一个-->
    <property>
        <name>xasecure.policymgr.clientssl.keystore.credential.file</name>
        <value>jceks://file/User/xxxx/work/keystore-hadoopdev-ssl.jceks</value>
    </property>

    <!--路径自己指定一个-->
    <property>
        <name>xasecure.policymgr.clientssl.truststore.credential.file</name>
        <value>jceks://file/User/xxx/work/truststore-hadoopdev-ssl.jceks</value>
    </property>
</configuration>

ranger-paimon-dev-security.xml

<?xml version="1.0"?>
<?xml-stylesheet type="text/xsl" href="configuration.xsl"?>
<configuration xmlns:xi="http://www.w3.org/2001/XInclude">
<!--此处填写测试环境创建的ranger service name-->
    <property>
        <name>ranger.plugin.paimon-dev.service.name</name>
        <value>paimonrt</value>
    </property>

    <property>
        <name>ranger.plugin.paimon-dev.policy.source.impl</name>
        <value>org.apache.ranger.admin.client.RangerAdminRESTClient</value>
    </property>
<!--此处填写测试环境的ranger admin url 不要写ip 如果有kerberos认证-->
    <property>
        <name>ranger.plugin.paimon-dev.policy.rest.url</name>
        <value>xxxxxx</value>
    </property>

    <property>
        <name>ranger.plugin.paimon-dev.policy.pollIntervalMs</name>
        <value>30000</value>
        <description>
            How often to poll for changes in policies?
        </description>
    </property>
    <property>
        <name>ranger.plugin.paimon-dev.policy.rest.ssl.config.file</name>
        <value>ranger-paimon-policymgr-ssl.xml</value>
        <description>
            Path to the file containing SSL details to contact Ranger Admin
        </description>
    </property>
<!--cache路径自己指定一个-->
    <property>
        <name>ranger.plugin.paimon-dev.policy.cache.dir</name>
        <value>/Users/xxxx/work/cache</value>
        <description>
            Directory where Ranger policies are cached after successful retrieval from the source
        </description>
    </property>
</configuration>

实现Plugin以及做验证,此处checkPermission()方法更详细的实现可以看,贴出的代码只是做个示例。

https://github.com/apache/ranger/compare/master...herefree:ranger:support-paimon-ranger

public class RangerPaimonPlugin extends RangerBasePlugin {

    public RangerPaimonPlugin(String serviceType) {
        super(serviceType, null, null);
        super.init();
    }

    public RangerPaimonPlugin(String serviceType, String serviceName) {
        super(serviceType, serviceName, null);
        super.init();
    }

}

public boolean checkPermission(AccessType accessType, PrivilegedEntity entity, UserGroupInformation ugi) {
          RangerPaimonPlugin plugin = new RangerPaimonPlugin('xxxx');
          RangerAccessRequestImpl request  = new RangerAccessRequestImpl();
          RangerResourceImpl      resource = new RangerResourceImpl();
          resource.setValue("queue", entity.getName());
          request.setResource(resource);
          request.setAccessType(getRangerAccessType(accessType));
          request.setUser(ugi.getShortUserName());
           request.setUserGroups(Sets.newHashSet(ugi.getGroupNames()));
           request.setAccessTime(new Date());
           request.setClientIPAddress(getRemoteIp());
          RangerAccessResult result = plugin.isAccessAllowed(request);
          return result == null ? false : result.getIsAllowed();
     }

Ranger Api

用户可以使用Api方式来对policy进行增删改查,当前也可以在rangerServiceUI上进行操作,这里记录下如何使用api方式创建policy。ranger官方api文档https://cwiki.apache.org/confluence/display/RANGER/Ranger+Client+Libraries

public class PaimonPolicyManager {
    private RangerClient rangerClient;

    private String policyName;
    private String RANGER_SERVICE_NAME;
    public void createPolicy() {
       //先通过api查找是否存在对应的policy
        Map<String, String> filter = new HashMap<>();
        filter.put("policyName", policyName);
        filter.put("serviceName", RANGER_SERVICE_NAME);
        List<RangerPolicy> policies = rangerClient.findPolicies(filter);
        if (policies.isEmpty()) {
            //不存在就创建新的policy
            rangerClient.createPolicy(creatPolicy("group", policyName, "db", "tb", Collections.singletonList("select")));
        }else{
            //存在的话就更新,在原有的policy上新增一个Policyitem(例如原来有select权限,后面在新增个drop权限)
            List<String> updatePermission = new ArrayList<>();
            if(checkPolicy(policies.get(0),"group","select")) {
                RangerPolicy rangerPolicy = addPolicyIterm(policies.get(0), "group", Collections.singletonList("select"));
                rangerClient.updatePolicy(RANGER_SERVICE_NAME,policyName,rangerPolicy);
            }
        }
    }

    public boolean checkPolicy(RangerPolicy rangerPolicy, String group, String permissionOp) {
        for (RangerPolicy.RangerPolicyItem policyItem : rangerPolicy.getPolicyItems()) {
            List<String> groups = policyItem.getGroups();
            if (!groups.contains(group)) {
                continue;
            }
            for (RangerPolicy.RangerPolicyItemAccess access : policyItem.getAccesses()) {
                if (access.getType().equals(permissionOp)) {
                    return true;
                }
            }
        }
        return false;
    }

    public RangerPolicy createPolicy(String group, String policyName, String dbname, String tbName, List<String> permissionOpsList) {
        RangerPolicy rangerPolicy = new RangerPolicy();
        rangerPolicy.setService(RANGER_SERVICE_NAME);
        rangerPolicy.setName(policyName);
        rangerPolicy.setResources(creatResource(dbname,tbName));
        List<RangerPolicy.RangerPolicyItem> rangerPolicyItemList = new ArrayList<>();
        for(String op:permissionOpsList) {
            RangerPolicy.RangerPolicyItem rangerPolicyItem = creatRangerPolicyItem(group, op);
            rangerPolicyItemList.add(rangerPolicyItem);
        }
        rangerPolicy.setPolicyItems(rangerPolicyItemList);
        return rangerPolicy;
    }

    public static Map<String, RangerPolicy.RangerPolicyResource> createResource(String dbName, String tbName) {

        Map<String, RangerPolicy.RangerPolicyResource> resourceMap = new HashMap<>();
        resourceMap.put("catalog", new RangerPolicy.RangerPolicyResource("paimon"));
        resourceMap.put("database", new RangerPolicy.RangerPolicyResource(dbName));
        resourceMap.put("table", new RangerPolicy.RangerPolicyResource(tbName));

        return resourceMap;
    }

    public RangerPolicy.RangerPolicyItem createRangerPolicyItem(String group, String permission) {

        RangerPolicy.RangerPolicyItem rangerPolicyItem = new RangerPolicy.RangerPolicyItem();
        rangerPolicyItem.setGroups(Collections.singletonList(group));
        RangerPolicy.RangerPolicyItemAccess rangerPolicyItemAccess = new RangerPolicy.RangerPolicyItemAccess();
        rangerPolicyItemAccess.setType(permission);
        rangerPolicyItemAccess.setIsAllowed(true);
        rangerPolicyItem.setAccesses(Collections.singletonList(rangerPolicyItemAccess));

        return rangerPolicyItem;
    }

    private RangerPolicy addPolicyIterm(RangerPolicy rangerPolicy, String group, List<String> permissionOpList) {

        List<RangerPolicy.RangerPolicyItem> addRangerPolicyItemList = new ArrayList<>();
        for (String permissionOp : permissionOpList) {
            addRangerPolicyItemList.add(createRangerPolicyItem(group, permissionOp));
        }
        List<RangerPolicy.RangerPolicyItem> policyItems = rangerPolicy.getPolicyItems();
        policyItems.addAll(addRangerPolicyItemList);

        return rangerPolicy;
    }

}
在Flinksql 解析的文章中,我们了解了filter是如何从sql下发到paimon,本文我们介绍下paimon拿到这些filter是如何进行优化的。

Flink PushDown

Flink 下发到Paimon用于过滤的接口:

1.SuportsFilterPushDown用于下推where语句里面的filter,注意返回值是两个List,acceptedFilters表示Source节点可以使用的filter,remainingFilters表示不可以使用的filter。acceptedFilters可以帮助Flink优化执行计划,例如对某个值的过滤原来需要在DataStream里面做,但是Source节点在读取数据时就可以做这部分过滤了,Flink DataStream就不用生成相关节点了。

2.SupportsProjectionPushDown用于下发Projection也就是select里面选择的字段,当前paimon还未发布的1.0中已经支持了嵌套类型(row里面在套一层row)的下发了。此处过滤主要是用于读取Parquet文件或者orc文件时可以通过对应接口直接做Column读。

public interface SupportsFilterPushDown {
    Result applyFilters(List<ResolvedExpression> filters);
    final class Result {
        private final List<ResolvedExpression> acceptedFilters;
        private final List<ResolvedExpression> remainingFilters;

        private Result(
                List<ResolvedExpression> acceptedFilters,
                List<ResolvedExpression> remainingFilters) {
            this.acceptedFilters = acceptedFilters;
            this.remainingFilters = remainingFilters;
        }
    }
}

public interface SupportsProjectionPushDown {
    boolean supportsNestedProjection();
    @Deprecated
    default void applyProjection(int[][] projectedFields) {
      
    }
    default void applyProjection(int[][] projectedFields, DataType producedDataType) {
        applyProjection(projectedFields);
    }
}

Paimon 过滤优化

版本1.0还未发布的master分支

Paimon总体的过滤分为两部分:

1.读取元数据时根据元数据里面的一些统计信息,过滤出真正需要读取的Datasplit下发到下游。

2.读取数据文件时,根据File index、delete vector信息(row过滤)、projection信息(cloumn级别过滤)来过滤。

Reader Meta

代码MonitorSource(也就是consumer id方式流消费)

paimon的元数据里面存着很多统计信息,例如partition字段的max&&min&&nullCount,数据文件的key的max&&min&&nullCount还有value的max&&min&&nullCount。

paimon在FlinkSourceBuilder时,将相应的过滤信息存到ReaderBuilder里面

org.apache.paimon.flink.source.FlinkSourceBuilder#createReadBuilder
private ReadBuilder createReadBuilder(@Nullable org.apache.paimon.types.RowType readType) {
        ReadBuilder readBuilder = table.newReadBuilder();
        if (readType != null) {
            readBuilder.withReadType(readType); //此处就是projection
        }
        readBuilder.withFilter(predicate); //此处是sql 里面where的过滤信息
        if (limit != null) {
            readBuilder.withLimit(limit.intValue());//此处是limit信息
        }
        return readBuilder.dropStats();
    }

paimon真正开始读取元数据,过滤读取核心逻辑在plan里面

readBuilder.newStreamScan().plan().splits();

plan里面一层层点进去最终实现是在

SnapshotReaderImpl#read->AbstractFileStoreScan#plan

org.apache.paimon.operation.AbstractFileStoreScan#plan
    public Plan plan() {
        long started = System.nanoTime();
        ManifestsReader.Result manifestsResult = readManifests();
        Snapshot snapshot = manifestsResult.snapshot;
        List<ManifestFileMeta> manifests = manifestsResult.filteredManifests;
        Iterator<ManifestEntry> iterator = readManifestEntries(manifests, false);
        List<ManifestEntry> files = new ArrayList<>();
        while (iterator.hasNext()) {
            files.add(iterator.next());
        }
        if (wholeBucketFilterEnabled()) {
            files =
                    files.stream()
                            .collect(
                                    Collectors.groupingBy(
                                            file -> Pair.of(file.partition(), file.bucket()),
                                            LinkedHashMap::new,
                                            Collectors.toList()))
                            .values()
                            .stream()
                            .map(this::filterWholeBucketByStats)
                            .flatMap(Collection::stream)
                            .collect(Collectors.toList());
        }

        List<ManifestEntry> result = files;
        long scanDuration = (System.nanoTime() - started) / 1_000_000;
        if (scanMetrics != null) {
            long allDataFiles =
                    manifestsResult.allManifests.stream()
                            .mapToLong(f -> f.numAddedFiles() - f.numDeletedFiles())
                            .sum();
            scanMetrics.reportScan(
                    new ScanStats(
                            scanDuration,
                            manifests.size(),
                            allDataFiles - result.size(),
                            result.size()));
        }
    }

过滤逻辑都发生在上方部分,AbstractFileStoreScan还有两个子类分别是AppendOnlyFileStoreScan(appendOnly表)与KeyValueFileStoreScan(主键表)。

具体过滤逻辑就不在这展开写了,可以看到以上几个Scan都有不同的Filter的属性值

AbstractFileStoreScan
    private Filter<Integer> levelFilter = null;
    private Filter<ManifestEntry> manifestEntryFilter = null;
    private Filter<String> fileNameFilter = null;
    private ManifestCacheFilter manifestCacheFilter = null;
KeyValueFileStoreScan
    private Predicate keyFilter;
    private Predicate valueFilter;
AppendOnlyFileStoreScan
    private Predicate filter;

这些不同的过滤都是在newScan时被进一步拆开。

值得一提的是,fileindex的过滤也可能在ReadMeta时发生。当FileIndex数据文件较小时,会存储在元数据里面,具体可见FileIndex篇讲解。

Read DataFIle

代码ReaderOperator(consumer id方式读取的下一个flink节点)

readBuilder.newRead().createReader(split)

这个Split就是上游节点传来的数据文件的元信息,各种过滤都发生在createReader(split)里面。主要是delevectors(Row级别)过滤,fileindex过滤,各种文件存储直接读取column的接口。

其中FileIndex相关过滤、DeletionVector Reader的创建还有传下来的projection都在下面代码。

org.apache.paimon.operation.RawFileSplitRead#createFileReader
private FileRecordReader<InternalRow> createFileReader(
            BinaryRow partition,
            DataFileMeta file,
            DataFilePathFactory dataFilePathFactory,
            FormatReaderMapping formatReaderMapping,
            IOExceptionSupplier<DeletionVector> dvFactory)
            throws IOException {
        FileIndexResult fileIndexResult = null;
        if (fileIndexReadEnabled) {
            fileIndexResult =
                    FileIndexEvaluator.evaluate(
                            fileIO,
                            formatReaderMapping.getDataSchema(),
                            formatReaderMapping.getDataFilters(),
                            dataFilePathFactory,
                            file);//此处对FileIndex进行过滤
            if (!fileIndexResult.remain()) { 
                return new EmptyFileRecordReader<>();
            }
        }

        FormatReaderContext formatReaderContext =
                new FormatReaderContext(
                        fileIO, dataFilePathFactory.toPath(file), file.fileSize(), fileIndexResult);
        FileRecordReader<InternalRow> fileRecordReader =
                new DataFileRecordReader(
                        formatReaderMapping.getReaderFactory(),
                        formatReaderContext,
                        formatReaderMapping.getIndexMapping(),//projection过滤对应的readDataFields在这里
                        formatReaderMapping.getCastMapping(),
                        PartitionUtils.create(formatReaderMapping.getPartitionPair(), partition));

        if (fileIndexResult instanceof BitmapIndexResult) {
            fileRecordReader =
                    new ApplyBitmapIndexRecordReader(
                            fileRecordReader, (BitmapIndexResult) fileIndexResult);
        }
//此处创建ApplyDeletionVectorReader
        DeletionVector deletionVector = dvFactory == null ? null : dvFactory.get();
        if (deletionVector != null && !deletionVector.isEmpty()) {
            return new ApplyDeletionVectorReader(fileRecordReader, deletionVector);
        }
        return fileRecordReader;
    }

本文主要简单聊一下flink sql如何解析,并将对应的filter下发到TableSource中SupportsFilterPushDown.applyFilters接口。最后在贴一下如何使用Flink相关Api来解析sql的示例。

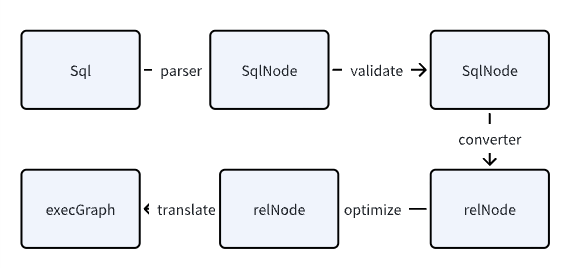
FlinkSql解析流程

在此处我们主要SELECT * FROM T WHERE f < 111.321 以解析此句查询paimon表的Sql为主Flink版本1.20

image-20241230005052100.png

1.Sql->SqlNode

通过Calcite将Sql语句转换成SqlNode。

ParserImpl.class
public List<Operation> parse(String statement) {
        CalciteParser parser = calciteParserSupplier.get();
        FlinkPlannerImpl planner = validatorSupplier.get();

        Optional<Operation> command = EXTENDED_PARSER.parse(statement);
        if (command.isPresent()) {
            return Collections.singletonList(command.get());
        }

        // 在此处内部实现将sql语句转换成SqlNode
        SqlNodeList sqlNodeList = parser.parseSqlList(statement);
        List<SqlNode> parsed = sqlNodeList.getList();
        Preconditions.checkArgument(parsed.size() == 1, "only single statement supported");
        return Collections.singletonList(
                SqlNodeToOperationConversion.convert(planner, catalogManager, parsed.get(0))
                        .orElseThrow(() -> new TableException("Unsupported query: " + statement)));
    }

2.SqlNode ->SqlNode

使用FlinkPlannerImpl类对SqlNode进行validate

SqlNodeToOperationConversion.class
public static Optional<Operation> convert(
            FlinkPlannerImpl flinkPlanner, CatalogManager catalogManager, SqlNode sqlNode) {
        // validate the query
        final SqlNode validated = flinkPlanner.validate(sqlNode);
        return convertValidatedSqlNode(flinkPlanner, catalogManager, validated);
    }

3.SqlNode->Operation(relNode)

注意:查询相关语句会从sqlNode转换成的Operation里面有relNode,DDL之类的语句是没有relNode的,例如CreateTableOperation里面含有flink的CatalogTable。

将SqlNode转换成relNode并且包在Operation里面。

org.apache.flink.table.planner.operations.converters.SqlNodeConverters#convertSqlNode
public static Optional<Operation> convertSqlNode(
            SqlNode validatedSqlNode, ConvertContext context) {
        SqlNodeConverter classConverter = CLASS_CONVERTERS.get(validatedSqlNode.getClass());
        if (classConverter != null) {
            return Optional.of(classConverter.convertSqlNode(validatedSqlNode, context));
        }

        SqlNodeConverter sqlKindConverter = SQLKIND_CONVERTERS.get(validatedSqlNode.getKind());
        if (sqlKindConverter != null) {
            return Optional.of(sqlKindConverter.convertSqlNode(validatedSqlNode, context));
        } else {
            return Optional.empty();
        }
    }

执行转换的是org.apache.flink.table.planner.operations.converters.SqlNodeConverter#convertSqlNode,它有多种实现类

public class SqlQueryConverter implements SqlNodeConverter<SqlNode> {
    @Override
    public Operation convertSqlNode(SqlNode node, ConvertContext context) {
         //此处内部实现其实是使用FlinkPlannerImpl.rel(node)
        RelRoot relational = context.toRelRoot(node);
        return new PlannerQueryOperation(relational.project());
    }
}

4.Operation(RelNode)->RelNode->Transformation

这是最核心的地方,主要是对RelNode进行Optimize。

1.首先会将Operation里面的RelNode(LogicalProject)转换成RelNode(LogicalSink)

2.执行optimize,就是在此处将SupportsFilterPushDown.applyFilters将过滤的逻辑下推到TableSource,优化时会执行一些优化规则,org.apache.flink.table.planner.plan.rules.logical.PushFilterIntoTableSourceScanRule就是将Pushdown下推到Table的优化规则。

override def translate(
      modifyOperations: util.List[ModifyOperation]): util.List[Transformation[_]] = {
//将modifyOperations里面的LogicalProject对象转换成Flink定义的LogicalSink
    val relNodes = modifyOperations.map(translateToRel) 
//优化
    val optimizedRelNodes = optimize(relNodes)
   //生成执行图
    val execGraph = translateToExecNodeGraph(optimizedRelNodes, isCompiled = false)
    //生成DAG
    val transformations = translateToPlan(execGraph)
    afterTranslation()
    transformations
  }

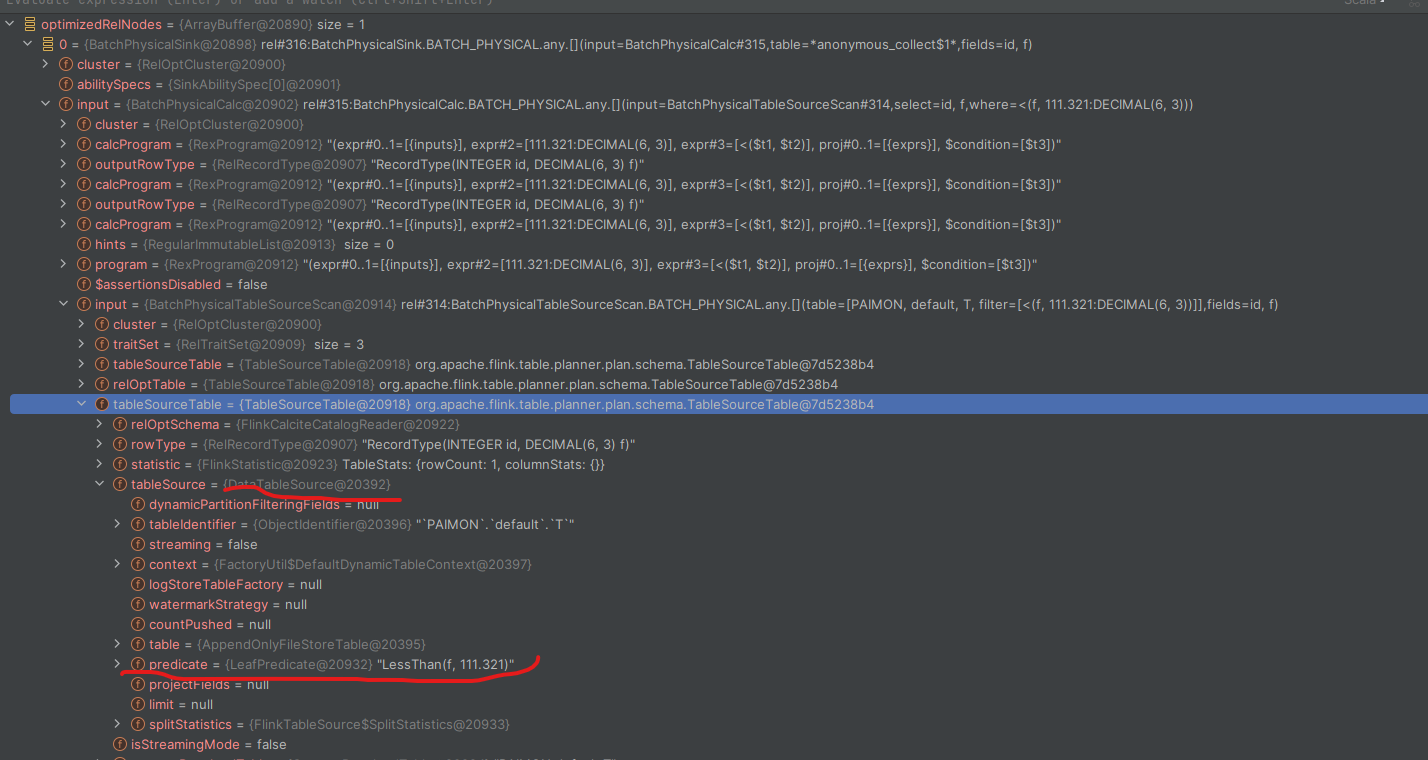
下面我们打印一下堆栈信息看一下优化后的optimizedRelNodes是不是含有filter信息。我在这是debug的查询paimon表,因此可以看红线部分已经将filter信息转换成了paimon表的predicate。

image-20241229234804492.png

3.之后就是生成执行图,生成transform DAG了

解析SQL代码示例

public static void main(String[] args) {
        TableEnvironmentImpl tableEnvironmentInternal = (TableEnvironmentImpl) TableEnvironment.
                create(EnvironmentSettings.newInstance().inBatchMode().build());
        List<Operation> parsedOperations = tableEnvironmentInternal.getParser().parse("select ");
        Operation operation = parsedOperations.get(0);
        if(operation instanceof CreateTableOperation) {
            CreateTableOperation createTableOperation = (CreateTableOperation) operation;
            //create table Operation内部可以获取到CatalogTable,可以用于对table校验
            CatalogTable catalogTable = createTableOperation.getCatalogTable();
            Map<String, String> options = catalogTable.getOptions();
            Schema unresolvedSchema = catalogTable.getUnresolvedSchema();
        } else if (operation instanceof ModifyOperation) {
            ModifyOperation modifyOperation =  (ModifyOperation) operation;
            PlannerQueryOperation child = (PlannerQueryOperation)modifyOperation.getChild();
            RelNode calciteTree = child.getCalciteTree();
            //不断递归input可最终获取到Table
            getTableScanTable(calciteTree);
        }
    }
    public void getTableScanTable(RelNode relNode) {
        if(relNode instanceof TableScan) {
            TableSourceTable table = (TableSourceTable)((TableScan) relNode).getTable();
            ContextResolvedTable resolvedTable = table.contextResolvedTable();
            ObjectIdentifier identifier = resolvedTable.getIdentifier();
            ResolvedSchema resolvedSchema = resolvedTable.getResolvedSchema();
        }
        relNode.getInputs().forEach(this::getTableScanTable);
    }

lookup join

Flink lookup 同步与异步调用的最终实现都是调用FileStoreLookupFunction,区别也就是在包了一层对象。

public static LookupRuntimeProvider create(
            FileStoreLookupFunction function, boolean enableAsync, int asyncThreadNumber) {
        NewLookupFunction lookup = new NewLookupFunction(function);
        return enableAsync
                ? AsyncLookupFunctionProvider.of(
                        new AsyncLookupFunctionWrapper(lookup, asyncThreadNumber))
                : LookupFunctionProvider.of(lookup);
    }

点进去最终实现也就是在lookupfunction中调用LookupTable。

public interface LookupTable extends Closeable {

    void specificPartitionFilter(Predicate filter);

    void open() throws Exception;

    List<InternalRow> get(InternalRow key) throws IOException;

    void refresh() throws Exception;

    void specifyCacheRowFilter(Filter<InternalRow> filter);
}

其中lookupTable有多种不同的实现,下面会进一步讲。

先说下LookupFunction都会做什么

open:根据不同的配置创建不同的lookupTable,之后调用lookupTable的open方法。

lookup:首先尝试tryRefresh(用于刷新lookupTable信息),之后调用lookupTable.get(key)获取返回结果包装成FlinkRow之后返回

FullCacheLookupTable

FullCache lookuptable 顾名思义就是将整张paimon表的数据都load到本地,这样在加载数据的时候只需要在本地加载数据就好,性能最高,但是由于数据都加载到本地,对磁盘要求较大,初始加载慢。又根据是否为主键表以及join key是否为主键又分为以下三种:NoprimaryKeylookupTable、primaryKeyLookupTable、SecondaryIndexLookupTable。

FullCacheLookupTable主要是依赖rocksDb+cache实现查询加速。

NoPrimaryKeyLookupTable

略。

PrimaryKeyLookupTable

我们这里简要说一下在open时读取以及更新数据时读取paimon表的步骤

open

public void open() throws Exception {
        openStateFactory(); //创建RockDB工厂类
        createTableState(); //创建RocksDb,以及Cache
        bootstrap(); // 读取paimon表数据写入到RocksDb SST文件
}

在bootstrap中会创建LookupStreamingReader读取paimon表中数据之后通过BinaryExternalSortBuffer进行排序,写入到内存,满了之后写磁盘,之后在将数据读取出来写入到RocksDb的SST,主键就是paimon表的key。

protected void bootstrap() throws Exception {
        Predicate scanPredicate =
                PredicateBuilder.andNullable(context.tablePredicate, specificPartition);
        this.reader =
                new LookupStreamingReader(
                        context.table,
                        context.projection,
                        scanPredicate,
                        context.requiredCachedBucketIds,
                        cacheRowFilter);  //此处还将projection传递给了下游可用于读取数据时的优化
        BinaryExternalSortBuffer bulkLoadSorter =
                RocksDBState.createBulkLoadSorter(
                        IOManager.create(context.tempPath.toString()), context.table.coreOptions());
        Predicate predicate = projectedPredicate();
        try (RecordReaderIterator<InternalRow> batch =
                new RecordReaderIterator<>(reader.nextBatch(true))) {
            while (batch.hasNext()) {
                InternalRow row = batch.next();
                if (predicate == null || predicate.test(row)) {
                    bulkLoadSorter.write(GenericRow.of(toKeyBytes(row), toValueBytes(row))); //读取数据排序写入。
                }
            }
        }

        MutableObjectIterator<BinaryRow> keyIterator = bulkLoadSorter.sortedIterator();
        BinaryRow row = new BinaryRow(2);
        TableBulkLoader bulkLoader = createBulkLoader();
        try {
            while ((row = keyIterator.next(row)) != null) {
                bulkLoader.write(row.getBinary(0), row.getBinary(1));//写入到RocksDb的SST
            }
        } catch (BulkLoader.WriteException e) {
      
        }

        bulkLoader.finish();
        bulkLoadSorter.clear();
    }

lookup->tryRefresh()

lookup时会首先尝试tryRefresh,如果需要做refresh时,会读取paimon表后续的snapshot的元数据文件,之后在根据快照读取数据,将数据更新到RocksDb中,之后让Cache中的对应key失效。在实现上Fangyong大佬还实现了个异步更新,具体实现就是开了个线程池,然后提交doRefresh任务

 public void refresh() throws Exception {
        if (refreshExecutor == null) {
            doRefresh();
            return;
        }
...
            doRefresh();
        } else {
            Future<?> currentFuture = null;
            try {
                currentFuture =
                        refreshExecutor.submit(
                                () -> {
                                    try {
                                        doRefresh();
                                    }
                                });
            } 
            if (currentFuture != null) {
                refreshFuture = currentFuture;
            }
        }
    }

其中doResh

private void doRefresh() throws Exception {
        while (true) {
            try (RecordReaderIterator<InternalRow> batch =
                    new RecordReaderIterator<>(reader.nextBatch(false))) {//读取数据
                if (!batch.hasNext()) {
                    return;
                }
                refresh(batch);//更新rocksdb,失效cache
            }
        }
    }
//读取数据的详细实现就是扫描出datasplits,然后用户通过并发或非并发的方式读取,可以看到真正读取数据文件的时候,里面还可以加一些过滤的优化
public RecordReader<InternalRow> nextBatch(boolean useParallelism) throws Exception {
        List<Split> splits = scan.plan().splits();
        FunctionWithIOException<Split, RecordReader<InternalRow>> readerSupplier =
                split -> readBuilder.newRead().createReader(split);
        RecordReader<InternalRow> reader;
        if (useParallelism) {
            reader =
                    SplitsParallelReadUtil.parallelExecute(
                            readType,
                            readerSupplier,
                            splits,
                            options.pageSize(),
                            new Options(table.options()).get(LOOKUP_BOOTSTRAP_PARALLELISM));
        } else {
            List<ReaderSupplier<InternalRow>> readers = new ArrayList<>();
            for (Split split : splits) {
                readers.add(() -> readerSupplier.apply(split));
            }
            reader = ConcatRecordReader.create(readers);
        }
        if (projectedPredicate != null) {
            reader = reader.filter(projectedPredicate::test);//读取数据加projecttion的优化
        }

        if (cacheRowFilter != null) {
            reader = reader.filter(cacheRowFilter);
        }
        return reader;
    }

lookup->lookupTable.get(key)

这块逻辑主要是现在Cache中取出数据如果cache中没有就在RocksDb中取出,并存入cache

SecondaryIndexLookupTable

略。

PrimaryKeyPartialLookupTable

local Table

懒加载的方式,taskManager首先会将元数据加载进来,之后当需要lookup的数据进来之后,根据元数据信息找到需要读取的数据文件,在进行加载,返回结果。

remote Table

需要通过Procedure或者Action启动一个单独的Flink任务作为一个service服务。其他flink任务可以通过调用这个Service服务来返回结果。

Paimon Flink Procedure

https://nightlies.apache.org/flink/flink-docs-release-1.18/zh/docs/dev/table/procedures/

Flink接口

Flink Procedure是依赖catalog的,实现自定义的Flink Procedure需要继承Procedure接口

public interface Procedure {
}

并且在自定义的catalog中需要实现两个方法


default List<String> listProcedures(String dbName) throws DatabaseNotExistException, CatalogException {
    throw new UnsupportedOperationException(String.format("listProcedures is not implemented for %s.", this.getClass()));
}
default Procedure getProcedure(ObjectPath procedurePath) throws ProcedureNotExistException, CatalogException {
        throw new UnsupportedOperationException(String.format("getProcedure is not implemented for %s.", this.getClass()));
    }

listProcedures用来返回所有用户自定义实现的存储过程的name,getProcedure方法传入的procedurePath中记录着对应的存储过程name,需要根据不同的name返回不同的存储过程。

Paimon实现

listProdures

public List<String> listProcedures(String dbName)
        throws DatabaseNotExistException, CatalogException {
    if (!databaseExists(dbName)) {
        throw new DatabaseNotExistException(name, dbName);
    }

    return ProcedureUtil.listProcedures();
}
public static List<String> listProcedures() {
    return Collections.unmodifiableList(
            FactoryUtil.discoverIdentifiers(
                    ProcedureBase.class.getClassLoader(), ProcedureBase.class));
}
public static <T extends Factory> List<String> discoverIdentifiers(
        ClassLoader classLoader, Class<T> factoryClass) {
    final List<Factory> factories = discoverFactories(classLoader);

    return factories.stream()
            .filter(f -> factoryClass.isAssignableFrom(f.getClass()))
            .map(Factory::identifier)
            .collect(Collectors.toList());
}

Paimon所有的Procedure都实现了抽象类ProcedureBase,抽象类ProcedureBase又实现了Flink的Procedure接口。通过Spi的方式将所有实现ProcedureBase的类都加载出来,并返回这些类对应的identifier(这就是对应的存储过程的name)。

org.apache.paimon.flink.procedure.CompactDatabaseProcedure
org.apache.paimon.flink.procedure.CompactProcedure
org.apache.paimon.flink.procedure.CreateTagProcedure
org.apache.paimon.flink.procedure.DeleteTagProcedure
org.apache.paimon.flink.procedure.CreateBranchProcedure
org.apache.paimon.flink.procedure.DeleteBranchProcedure
org.apache.paimon.flink.procedure.DropPartitionProcedure
org.apache.paimon.flink.procedure.MergeIntoProcedure
org.apache.paimon.flink.procedure.ResetConsumerProcedure
org.apache.paimon.flink.procedure.RollbackToProcedure
org.apache.paimon.flink.procedure.MigrateTableProcedure
org.apache.paimon.flink.procedure.MigrateFileProcedure
org.apache.paimon.flink.procedure.RemoveOrphanFilesProcedure
org.apache.paimon.flink.procedure.QueryServiceProcedure
org.apache.paimon.flink.procedure.ExpireSnapshotsProcedure

getProcedure

public Procedure getProcedure(ObjectPath procedurePath)
        throws ProcedureNotExistException, CatalogException {
    return ProcedureUtil.getProcedure(catalog, procedurePath)
            .orElseThrow(() -> new ProcedureNotExistException(name, procedurePath));
}
public static Optional<Procedure> getProcedure(Catalog catalog, ObjectPath procedurePath) {
    if (!Catalog.SYSTEM_DATABASE_NAME.equals(procedurePath.getDatabaseName())) {
        return Optional.empty();
    }
    try {
        ProcedureBase procedure =
                FactoryUtil.discoverFactory(
                                ProcedureBase.class.getClassLoader(),
                                ProcedureBase.class,
                                procedurePath.getObjectName()) //这就是传入的存储过程的名字
                        .withCatalog(catalog);
        return Optional.of(procedure);
    } catch (FactoryException e) {
        return Optional.empty();
    }
}
public static <T extends Factory> T discoverFactory(
        ClassLoader classLoader, Class<T> factoryClass, String identifier) {
    final List<Factory> factories = discoverFactories(classLoader);

    final List<Factory> foundFactories =
            factories.stream()
                    .filter(f -> factoryClass.isAssignableFrom(f.getClass()))
                    .collect(Collectors.toList());

    if (foundFactories.isEmpty()) {
        throw new FactoryException(
                String.format(
                        "Could not find any factories that implement '%s' in the classpath.",
                        factoryClass.getName()));
    }

    final List<Factory> matchingFactories =
            foundFactories.stream()
                    .filter(f -> f.identifier().equals(identifier))
                    .collect(Collectors.toList());

   ......

    return (T) matchingFactories.get(0);
}

可以看到getProcedure也是通过spi方式将所有的类进行加载,并根据传入的存储过程的name返回对应的实现类。